![]()
Hot unique accessories for American
Sports Cars! Like the cars
our accessories are made in
America!
►
Home ►
Customer Service
►
Contact
►
Cool Car Links
| Custom Graphics Installation Instructions |
Please read directions carefully.
|
The following are application instructions for
custom graphics. These procedures must be followed prior to any
consideration by HCA and/or it’s graphic manufacturers in regard
to replacement or credit.
Failure to follow instructions listed below in bold red letters may result in product failure and be considered non-warrantable. |
| Please note that for any horizontal application of vinyl graphic products, such as a vehicle hood or roof, Warranty coverage is reduced by 50%. |
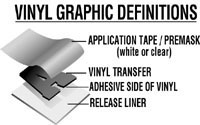
Graphic Materials Information |
|
| Storage and Rotation: | |
| Stock rotation and climate-controlled storage are important. Age and temperature extremes degrade the adhesive and can dramatically reduce its effectiveness. Product should be used within the recommended storage life of two years. In addition, product should be stored in an environment between 60 and 90 degrees Fahrenheit. | |
| Temperature Recommendations: | |
| Surface temperature should be between 50 and 90 degrees Fahrenheit before attempting the installation. As a general rule, if the surface is hot to the touch it's over 90 degrees Fahrenheit. Adhesive becomes brittle when it gets too cold and gummy when it gets too hot. Applications outside the recommended range of 50 to 90 degrees Fahrenheit reduce the adhesives' ability to perform. | |
| Preparation & Cleaning Procedures | |
|
****An Important Note about Cleaning. Please Read.**** |
|
|
Why Surface Preparation is More Important Than Ever Before! Due to an increased usage of
silicone based additives in automotive paint that traditionally
contained only solvents or oil derivatives, the
pressure-sensitive graphics industry is facing adhesion
challenges. The result of these changes is the need for
increased awareness towards surface preparation and application
methods. To reduce the amount of solvents
in some of the newer "heavy solids" paint and clearcoat
products, silicone-based additives are used as flow agents. As
the solvents evaporate during the curing process, silicone
particles migrate to the surface, leaving a silicone residue. In
fiberglass manufacturing, mold release agents may also leave a
silicone residue. Traditional surface preparation
for graphics application has consisted of chemical washing. Most
cleaners contain a hydroxyl compound (acetone, alcohol) or a
petroleum base (kerosene, zylene) solvent. These solvents work
by dissolving oil-based impurities that are on the surface. Silicone, however, does not
dissolve. Removal of siliconates occurs through emulsification
(suspension of small globules within the liquid, like oil in
water). Soap and water will generally outperform solvent for
silicone emulsification. However, an extra wash process costs
applicator time and it may not always be necessary. FAILURE TO FOLLOW INSTRUCTIONS IN RED MAY RESULT IN ADHESION FAILURE. |
|
|
Cleaning Procedures: |
|
All
surfaces are contaminated to some degree. To ensure good
adhesion to any vehicle surface, it is critical that you follow
these recommended procedures in decontaminating and preparing
the surface prior to any vinyl product installation. A clean,
lint free towel or cloth must be used between each of the
cleaning steps to prevent cross-contamination.
|
|
| Installation Guidelines | |
| Application Procedures: | |
|
|
|
|
|
|
Illustrated Installation Procedures |
|
 |
|
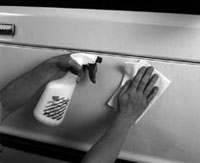 |
Step 1 Clean the surface with our Rapid Prep Pre-Cleaner or a few drops of grease-cutting liquid detergent in water (do not use a petroleum base cleaner). Rinse clean with fresh water then dry with a lint-free cloth. Wiping surface with our Rapid Tac, Rapid Tac II or alcohol will also help remove any contamination and enhance the adhesion process. |
|
|
Step 2 Put a piece of masking tape on each end of your vinyl transfer in the area where you plan to apply it and anchor each end to the application surface with masking tape. |
 |
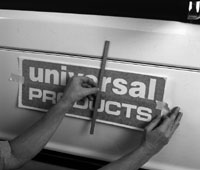
Step 3 Estimate the center of your vinyl transfer and place two vertical lengths of masking tape to secure the vinyl transfer and create a center hinge as shown in the illustration. This step allows you to apply half of the vinyl transfer at a time. |
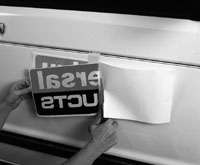 |
Step 4 Remove the masking tape anchor from one end of your vinyl transfer and SLOWLY peel the release liner away towards the center masking hinge. Be careful not to touch the adhesive side of the vinyl transfer. Use scissors to cut away the excess release liner and discard. |
 |
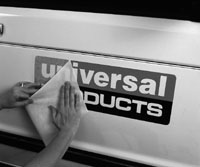
Step 5 Hold your vinyl transfer by the application tape, careful not to touch the vinyl adhesive to the application surface until you are ready to squeegee. Beginning at the center hinge, make easy overlapping, pushing strokes with your squeegee. Remove the center hinge tape and slowly peel the remaining release liner away. Squeegee the other half of the vinyl transfer, working from the center to the edges. |
 |
Step
6
|
| Wet Application Method: Spraying a light mist of our Rapid Tac or Rapid Tac II application solution onto your application surface will delay the adhesive activation between the bonding surface and vinyl transfer, resulting in a bubble-free, wrinkle-free application. CAUTION: Wet application may delay the immediate removal of the application tape. A waiting period of up to 30 minutes may be necessary. | |
Exterior Graphic Care |
|
Today's finest pressure-sensitive vinyl materials have been used to create your new graphics. These graphics require little maintenance and should be treated similarly to a painted surface.
|